Use Your iPhone’s Built-in Features to Create Professional-Quality Photos!
- Feb 21, 2023
- 6 min read

High-quality, professional-looking product photos are essential for any small business owner.
But what if you don’t have the right tools or professional photographers at your disposal?!
Luckily, there’s one valuable tool we can all take advantage of — our smartphones!
Today’s iPhones come with some impressive photography and editing features that let you quickly create the quality photos you need to showcase your products in the best light.
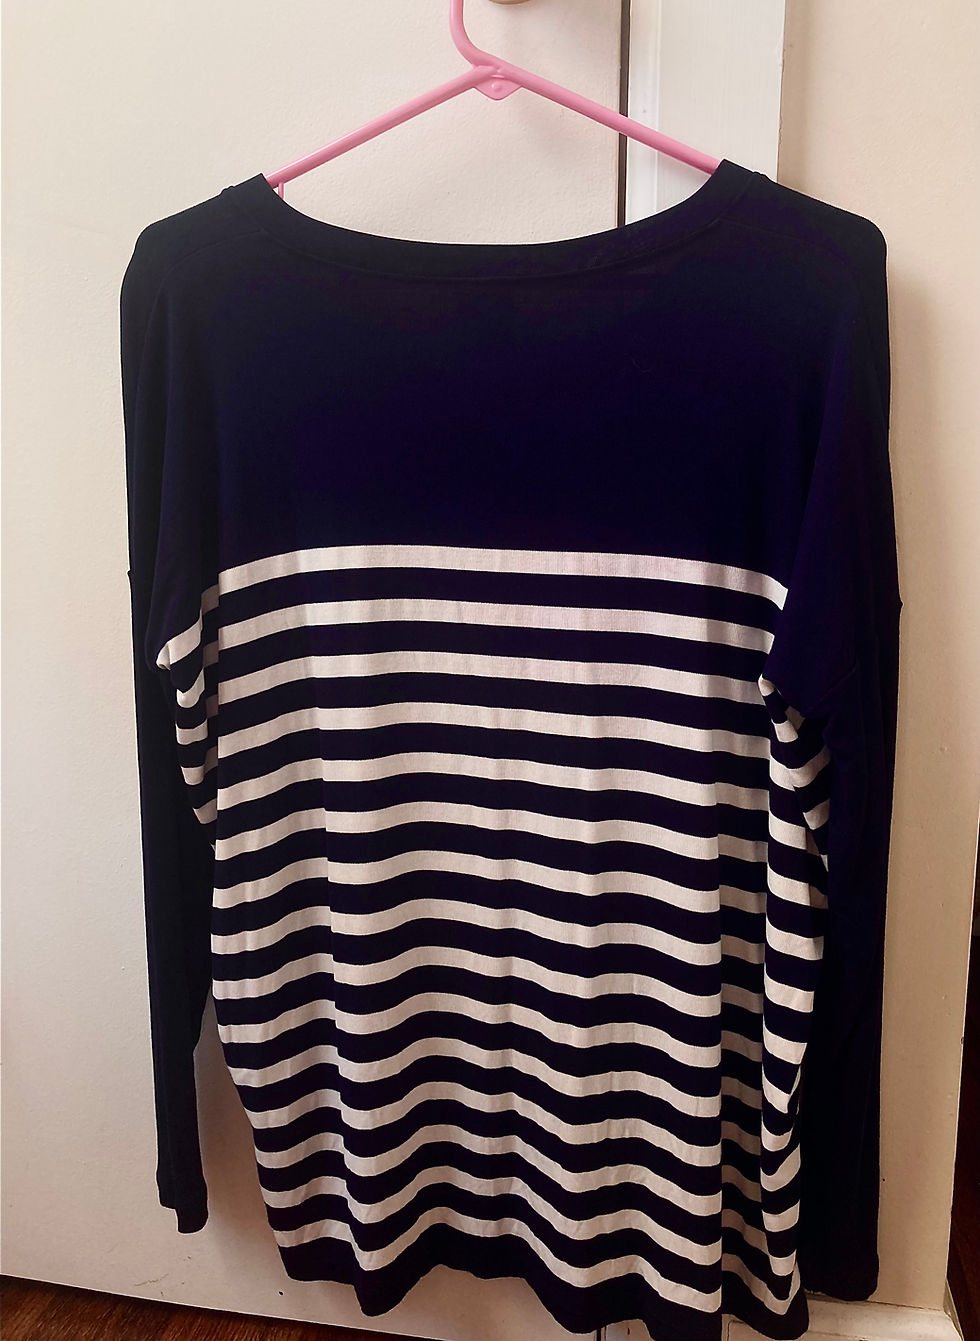
So, stay with me if you want to learn how I went from this…

To this!
Adjust Your Settings Before You Snap a Photo!
The best photos begin before you even press the shutter button.
You probably already know how to do simple things, like turn the HDR, Live Photo, and flash options on and off.
But it took some time before even I learned all the elements an iPhone’s camera can adjust before snapping a photo!
At the top of the main camera page, you’ll see a small toolbar.
You can click the lightning bolt to turn the flash on or off, the “HDR” button to turn High-Dynamic Range on or off, or the Live Photo icon in the top right corner to turn Live Photo on or off.
But, when you click that tiny arrow in the center, it opens a whole new world of possibilities.


In this new bottom menu, you’ll see a few options. Some of them will be familiar, but the others give you much more control over how you take your photo.
Change Your Aspect Ratio
Adjusting your camera’s aspect ratio lets you snap a perfectly sized picture and ensure all the necessary elements show when you upload it to social media or your website.

For things like Instagram Stories and Facebook posts, sticking with the default 4:3 aspect ratio is okay.
But, if you want to upload the image to your Instagram feed, choosing the “Square” option will ensure everything still looks the way it should when the image is resized.
16:9, on the other hand, is the best aspect ratio to choose if you’ll be showing your product photos on a bigger screen, like a TV or computer monitor.
Adjust Your Exposure
The next icon, a circle with a plus sign on top and minus sign on the bottom, lets you adjust your lens exposure.
This is one of my favorite tools — we’ve all tried to take a photo with a less-than-optimal light source before, but it usually results in a picture that looks something like this:

Adjusting your exposure lets you control how much light your camera lens lets in.
Turning the exposure down will decrease the amount of light in a photo:

While turning the exposure up can turn this…

Into this!

Add a Timer
Want to take a posed photo, but don’t have anyone to hold the phone and press the shutter button for you? No problem!
The next option you’ll see looks like a little clock, and lets you choose to set a three-second timer, a ten-second timer, or turn the timer off.

Just position your phone, choose a timer, press the shutter button, and pose!
Make Adjustments After You Take a Photo
After you take the best photo possible using your iPhone’s camera tools, it’s time to refine it through the built-in editing features.
The first thing I do is duplicate any photos I’m editing — that way, I can always go back and start over if I make any mistakes!
Select your photo, then press the three dots in the upper right corner. Then, select “Duplicate.”

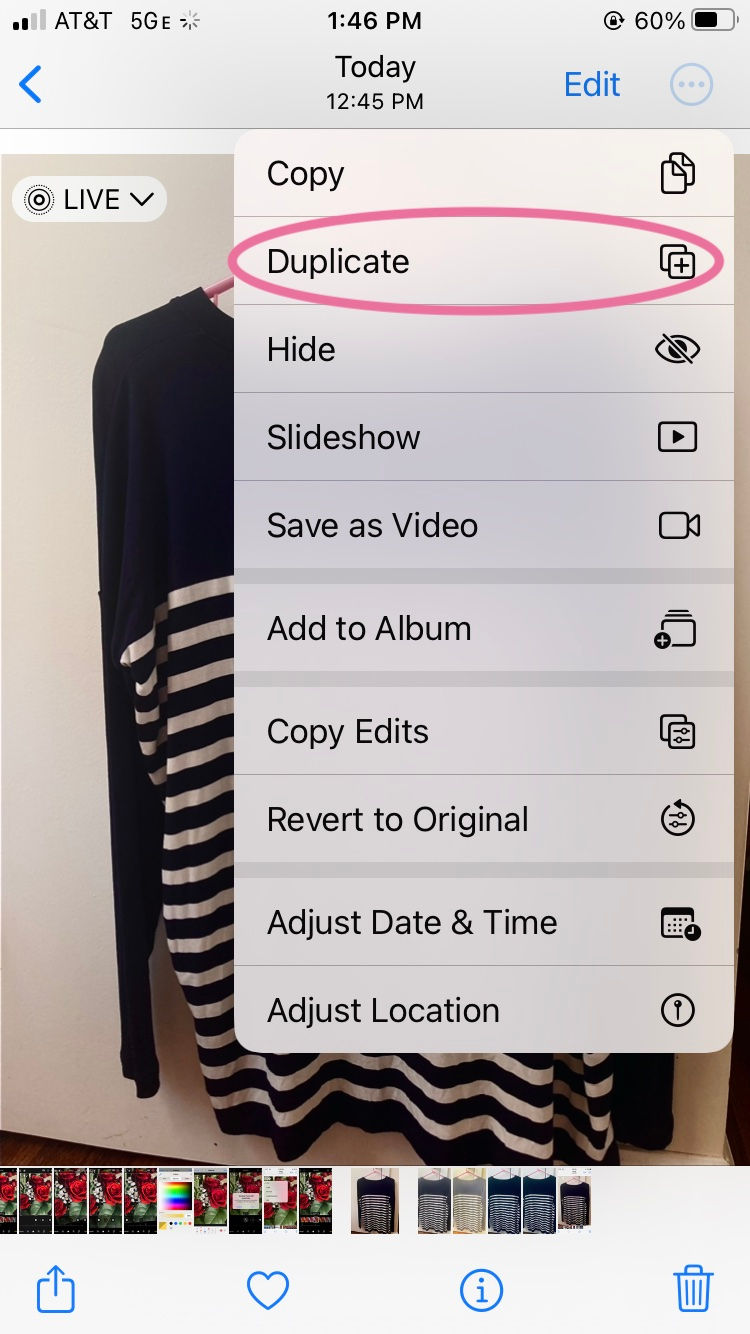
If your photo is a Live Photo, your phone will ask if you want to duplicate it as a Live Photo or just copy the still. I recommend duplicating the Live Photo!

Once you have your copy ready, it’s time to start editing! Just press the “Edit” button next to the three dots to get started.

What Does Each Adjustment Do?
Once you press “Edit,” you’ll see a huge carousel of options appear underneath the photo.
There are a lot of things you can adjust, but Apple doesn’t exactly make what each option does clear.
Here’s a cheat sheet:
● Auto: Automatically apply the best adjustments to enhance your photos.
● Exposure: We covered this one — control the amount of light in your photo.
● Brilliance: Brighten the shadows and lower the highlights to make your photo look more vibrant and clearer.
● Highlights: Increase or decrease color on the lightest parts of a photo.
● Shadows: Just like highlights, but for the darkest parts of a photo.
● Contrast: Increase or decrease the difference between the darkest and lightest parts of a photo.
● Brightness: This one is self-explanatory — increase or decrease the brightness of the photo.
● Warmth: Increase or decrease the amount of warm tones (reds, yellows, oranges) in a photo.
● Tint: Adjust the color “temperatures” in a photo.
● Black Point: This one is tricky — an image’s “black point” is its darkest part, and adjusting the black point sets the point where this part will become completely black.
● Saturation: Change how intense each color appears.
● Vibrance: Make muted colors look more intense while maintaining saturated elements.
● Sharpness: Reduce or increase the amount of “blur” a photo has.
● Definition: Sharpen or blur your photo’s edges, increase or decrease contrast.
● Noise Reduction: Remove “graininess” from your photo.
● Vignette: A photo effect that simulates light falling off around the edges of your photo.
Every image is different, so play around with each of these options using the slider until you’re satisfied. And remember, since you duplicated the image, you can always go back and start over if you make any mistakes!
Editing the Live Photo
Underneath the carousel of editing options, you’ll see another chain of icons. If your photo is a Live Photo, the one all the way to the left will let you change your “Key Photo,” or the image still.

Press this icon, then drag the slider until you find the best shot. Then, select “Make Key Photo!”

This is a great tool to use when you’re shooting a live or moving object. If the initial Key Photo is blurry, just drag the slider until you find a better-quality image.
Choosing a Filter
The third icon in this lower chain allows you to select a filter.

You’ve probably used this tool before, but you might not know that you can adjust the filter’s strength!
Choose your favorite filter, then look underneath the options for a slider.
Move the slider to the right to make the filter less prominent or move it to the left to filter the image even more.


Crop, Straighten, or Rotate
The last option in this lower carousel, all the way to the right, will let you crop, straighten, or rotate your photo.

When you press this icon, a grid will appear around your photo. If there’s anything you’d like to crop out of your image, just drag the corners to frame what you want to keep!
For example, I cropped the power cord out of the right side of this image:


Now, onto the carousel…
The first option lets you straighten out crooked photos. Just drag the slider to the left to rotate it clockwise or drag it to the right to rotate it counterclockwise.

The second option in the carousel lets you rotate the photo from the center on its horizontal axis.
Move the slider to the left to rotate it downward, or to the right to rotate it upward.


And the last option lets you rotate the image from the center on its vertical axis — move the slider to the right to move the image toward the left, or move it to the left to turn the image to the right.


Other iPhone Editing Tips
We’ve covered nearly every way you can adjust your camera settings and edit photos on your iPhone – but no tutorial would be complete without a couple of bonus tips!
Here are two of my favorite “hidden features.”
Copy/Paste Edits
Forget to duplicate your photo before making all your edits? No worries!
While you’re editing a photo, press the three dots in the upper right corner and select “Copy Edits.”

Now, you can safely exit the editor without saving your changes, duplicate the photo, and add back the adjustments instantly!
After making a duplicate, open it and select “Edit.” Then press the three dots again.
This time, select “Paste Edits!”


Change Your Live Photo Type
There are also a few cool effects you can create with a Live Photo! These include:
● Loop: This will play the Live Photo animation on a loop.
● Bounce: This will “bounce” the Live Photo animation, similar to an Instagram Boomerang!
● Long Exposure: This will combine all the Live Photo frames to create a long exposure effect.
To adjust these settings, open a Live Photo in your Photos app, then press the tiny arrow next to the “Live” icon on the photo.
Now, select an option from the menu that appears! In addition to the three options listed above, you’ll also see a choice to turn the Live Photo off.

Become a Professional Photographer from Your Phone Screen!
You don’t need a professional camera or hire a professional photographer to create the best product images possible — all you need is your iPhone!
It can be tricky to get started, but once you get comfortable with how everything works, you’ll be taking professional-quality photos every time you open your camera.

Comments