Take Your Photos to the Next Level with These iPhone Camera Tricks!
- May 28, 2021
- 6 min read

Almost everyone these days takes pictures exclusively on their smartphone. If you don’t exactly know what you’re doing, however, these photos can leave a lot to be desired! The good news? There are a lot of hidden gems on the iPhone camera app! Here are some of the best tips and tricks to step up your smartphone camera skills.
1. Keep Your Lens Clean
Let’s face it - our phones are almost always in our hands, in our pockets, or in our purses. Over time, it’s no surprise that the lens of our cameras can pick up a lot of dust, dirt, and fingerprints that affect the quality of photos.
It seems almost too simple to mention, but cleaning off your lens with a soft, clean cloth before taking any pictures can make a world of a difference. You can use the bottom of a cotton shirt, a microfiber cloth, or a glasses cleaning cloth to get rid of all the grime and really sharpen your photos! Take a picture before and after - you’ll be shocked at the difference in quality.
2. Change and Lock Your Focus Point
You may have seen a small yellow square pop up on your camera screen before - that’s your iPhone’s way of automatically setting the focus point on the image. But, did you know that you can manually adjust the focus if your camera tries to focus on the wrong thing?
All you have to do is tap the screen on the object you want to focus on, and your camera will bring it into focus and slightly blur everything else.

To make sure the camera doesn’t automatically re-adjust, you can also lock the focus point by holding down on the object on the screen until “AE/AF Lock” appears at the top of the picture.

This way, the focus will stay on the same point until you close the camera app!
3. Use HDR (High Dynamic Range) Mode for Better Color
iPhone cameras don’t exactly offer Canon EOS-level quality. They don’t capture highly-contrasted images well in standard camera mode, but using HDR (high dynamic range) mode can help! This way, you’ll be able to capture all the light and dark details easily.
Newer iPhones will automatically have HDR enabled. If Smart HDR is not enabled or you have an older model, you can enable it by pressing “HDR” in the top right corner of the camera screen. When off, the circle will have a slash through it. Once you turn it on, the slash will disappear.

If you have a newer iPhone and for some reason, Smart HDR is turned off, you can fix this in your settings. Navigate to the Camera settings, then scroll to the bottom and toggle “Smart HDR” to the on position.

Now, you’ll be able to capture images with a lot of both dark and light details easily!
4. Use Burst Mode for Moving Images
Whether it’s a pet who can’t sit still or a performer at a live show, moving images are notoriously difficult to capture. One solution to this problem? Burst mode. You may have accidentally activated Burst mode while trying to take a single photo before because it’s so easy to do!
All you have to do is hold your finger down on the shutter button for at least one second, and the camera will automatically take 10 photos per second until you let go of the button. Now, you can look through the images and find the one that best captures the subject!
5. Adjust the Exposure Before Taking Your Photo
When you tap on your camera screen to bring up the yellow focus box, you’ll see a small sun icon to the right.

By dragging the icon up, you can increase the brightness. By dragging it down, you’ll be able to darken your photo. Adjust the exposure as necessary to get the perfect amount of light before you take your photo!


6. Use the Self-Timer for Steadier Shots
Not everyone has perfect balance, and a shaky or unsteady hand can ruin the perfect shot. If you find it difficult to take a steady photo of a fixed object, using the iPhone self-timer can be a huge help!
Position your phone on a sturdy object and compose the shot as you’d like it. Now, turn on your self-timer, sit back (far enough that you won’t accidentally hit the camera!), and let the timer do the work for you.
To turn on self-timer, you’ll first want to open the arrow at the top center of your camera app screen.

Now, find the timer icon and click it to set the delay. You can choose either three or 10 seconds, so choose whichever option will give you enough time to press the shutter button and stand back before the camera takes the photo!


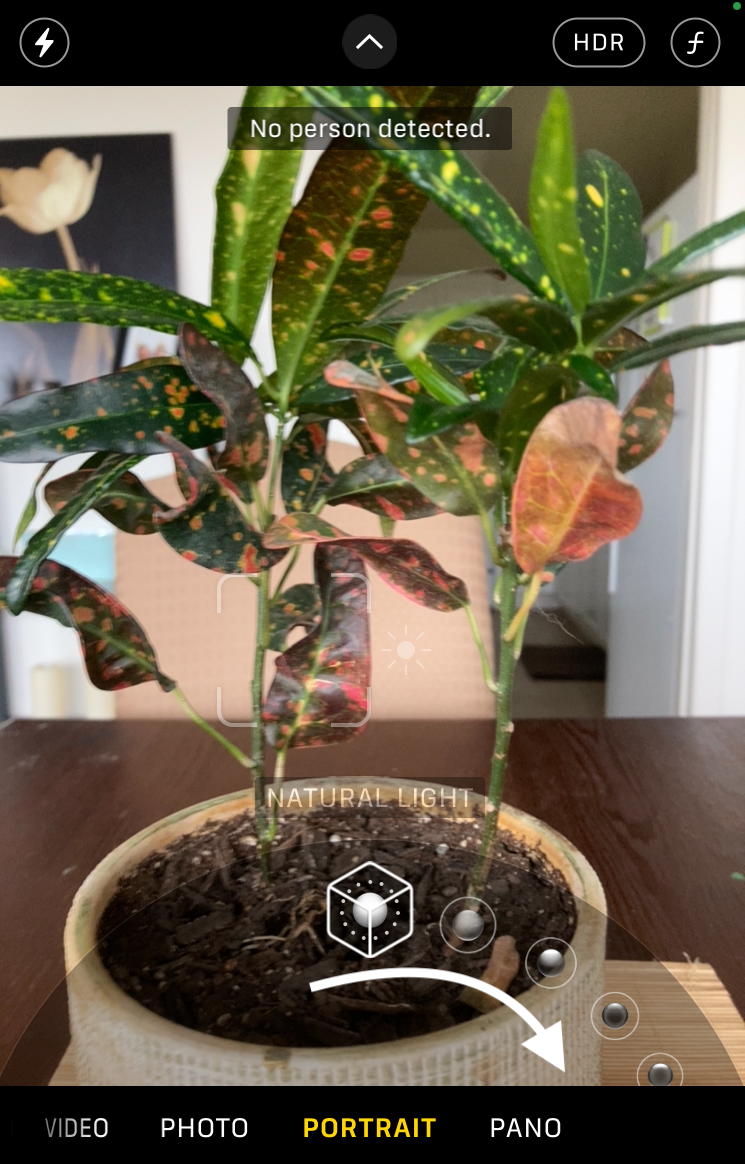
7. Use Portrait Mode to Take Better Selfies
We all love to take selfies, both for business and personal use! If you have a newer iPhone model, you may have heard about something called “Portrait Mode.” Portrait mode is a setting that will automatically recognize faces in photos. It sharpens faces while blurring the background for a crisper, higher-quality final product.
To use Portrait mode, select “Portrait” at the bottom of the screen where you’d choose options like “Photo” or “Video.”

Once Portrait mode has been selected, you’ll notice a small box at the bottom that says “Natural Light” above it.

If you press on the small box, you can choose from several different lighting options that will adjust to take the best possible photo for the lighting you’re in! Some of the options include Studio Light, Stage Light, and Contour Light. Scroll through until you find the lighting that best complements the photo.
Bonus Tip: Did you know that you can take photos by pressing the volume up button on the side of your phone? It can be difficult to reach the shutter button when posing for a selfie, and using the volume button might be easier and take a crisper photo of your face!
8. Turn Live Photo On to Capture the Perfect Moment in Time
Live Photo is an option that captures the 1.5 seconds before and after a photo is actually taken, allowing you to edit and choose the moment that best captures the subject. To turn on Live Photo, look at the top right corner of your camera app and make sure the Live Photo icon does not have a slash through it.

Once you take your live photo, open it in your camera roll. From there, press “Edit” in the top right corner. Press the Live Photo icon all the way to the left, and drag the slider to the position where the photo looks the best. Press “Make Key Photo,” and it will change to the part you select!


This tip works great for moving objects, as well as group photos where one person is captured with their eyes closed! There’s no need to line everyone back up, just adjust the key photo as needed.
9. Edit and Add Filters in Your Camera Roll
You may already know how to do some light editing in your camera roll, but you probably don’t know just how deeply you can edit the pictures you take on your iPhone! While viewing a picture in your camera roll, press “Edit” in the top right corner and scroll through your options. You can adjust things like the exposure, highlights, brilliance, and contrast, all one by one!
If you press “Auto,” the first editing tool you’ll see, the app will automatically adjust every option to best showcase the subject and lighting.


In addition to editing each aspect, you can also add and adjust filters while editing on your camera roll! When you first press “Edit,” you’ll automatically be brought to level adjustment where you can change brightness, contrast, etc. If you press on the next icon over, you’ll be brought to filters.

From there, you can scroll through and find a filter you like. If it’s too intense, just drag the slider at the bottom to decrease the overlay! Adjust the filter until the image is perfect.


10. Crop, Straighten, and Zoom
Using the crop editing option all the way to the right on the bottom of the editing screen, you can change the zoom, orientation, and crop of your image! To get started, press the crop icon.

The first icon will allow you to straighten the image, in case your camera was on a slight tilt when you took the photo. Just use the slider to drag the image one way or the other until it is straight.

The second option will let you zoom along either the top or bottom of the image, using the slider.


The option on the right will allow you to do the same, but along the sides rather than the top or bottom.


To crop your image, just drag along the corners of the grid until the image is cropped to your liking.


If you want to zoom in on a certain point, just use your fingers to zoom in on the photo as you’d do with any other image!
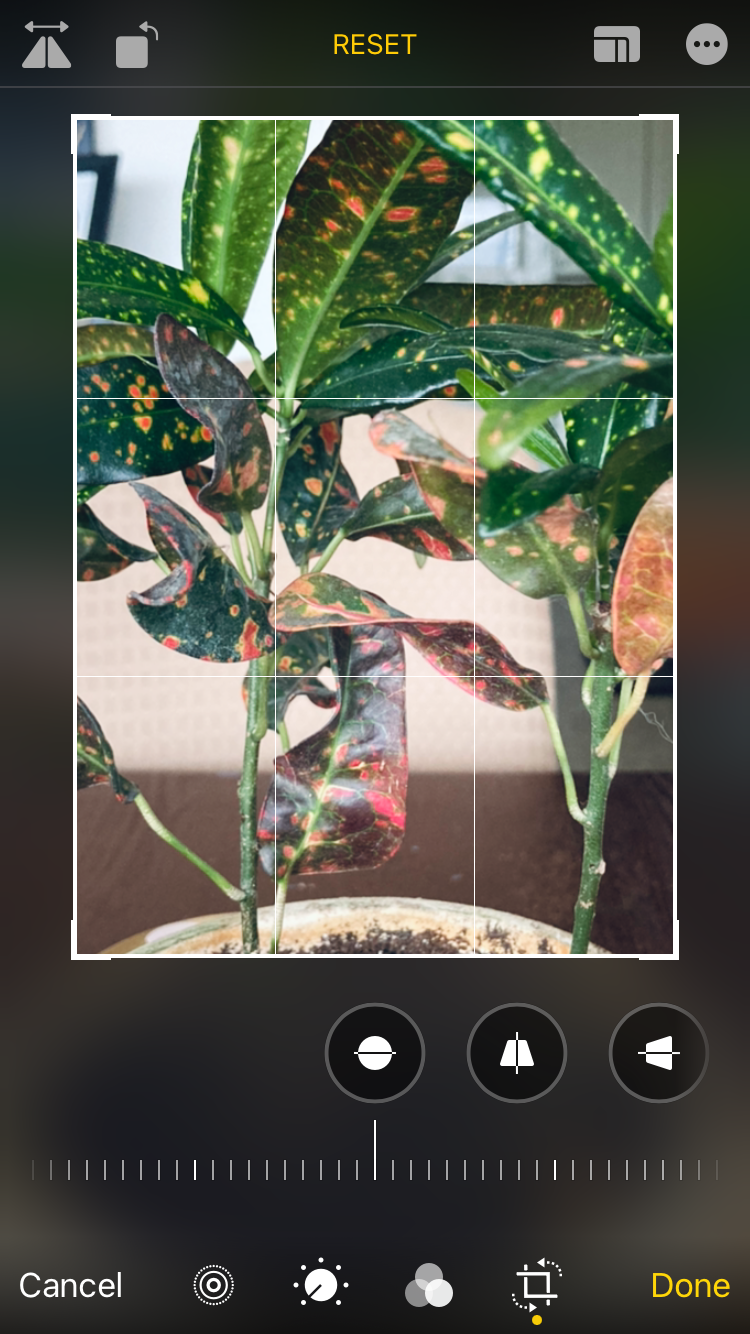
Once you’re done cropping, zooming, and straightening, make sure to save your changes by pressing “Done” in the lower right corner.
Level Up Your iPhone Camera Skills!
There’s no shame in taking all of your photos on an iPhone! When you know what you’re doing, it’s easy to get professional-looking images without spending hundreds or thousands of dollars on a professional-quality camera.


Comments