5 Technical Skills You Need to Improve Your Small Business Marketing!
- mattiesprague
- Jul 21, 2023
- 5 min read

Running a small business online doesn’t come without challenges — and one of the biggest challenges is learning all the technical skills you need when problems inevitably pop up!
Don’t let minor issues turn you from social media. Here are the five technical skills I find most valuable for my own small business marketing!
Convert Your Photos to Meta-Friendly Formats
If you’re an iPhone user, you probably know that your phone doesn’t take pictures in the most Meta-friendly format. Photos taken on your camera are automatically saved in HEIC format, which Meta doesn’t let you upload.
But, there’s an easy way to convert photos in your Camera Roll to JPEG, a much more widely-accepted format — no app downloads or file transfers required!
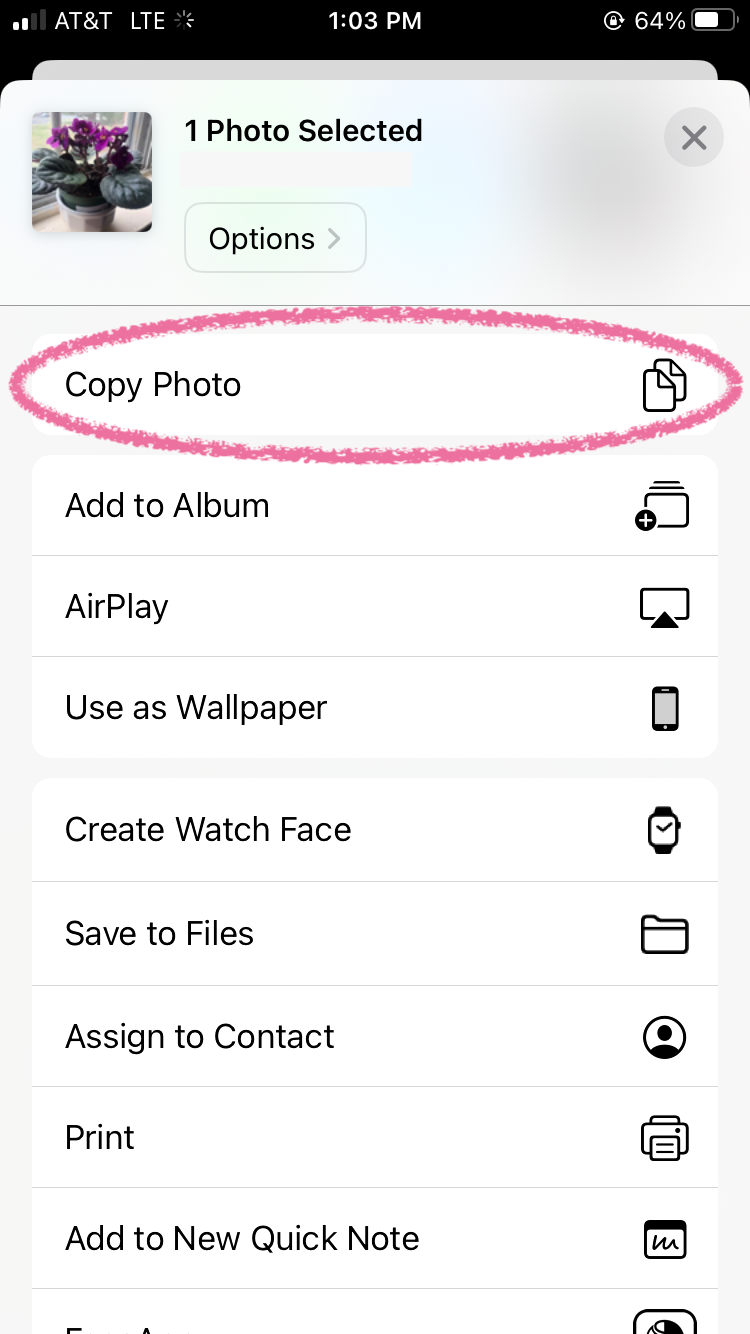
To get started, open the photo you want to convert in your Camera Roll. Then, tap the Share icon in the bottom-left corner. Scroll down and tap “Copy Photo.”


Now, open your iPhone’s search bar and type in “Files.” Then, tap to open the Files app.

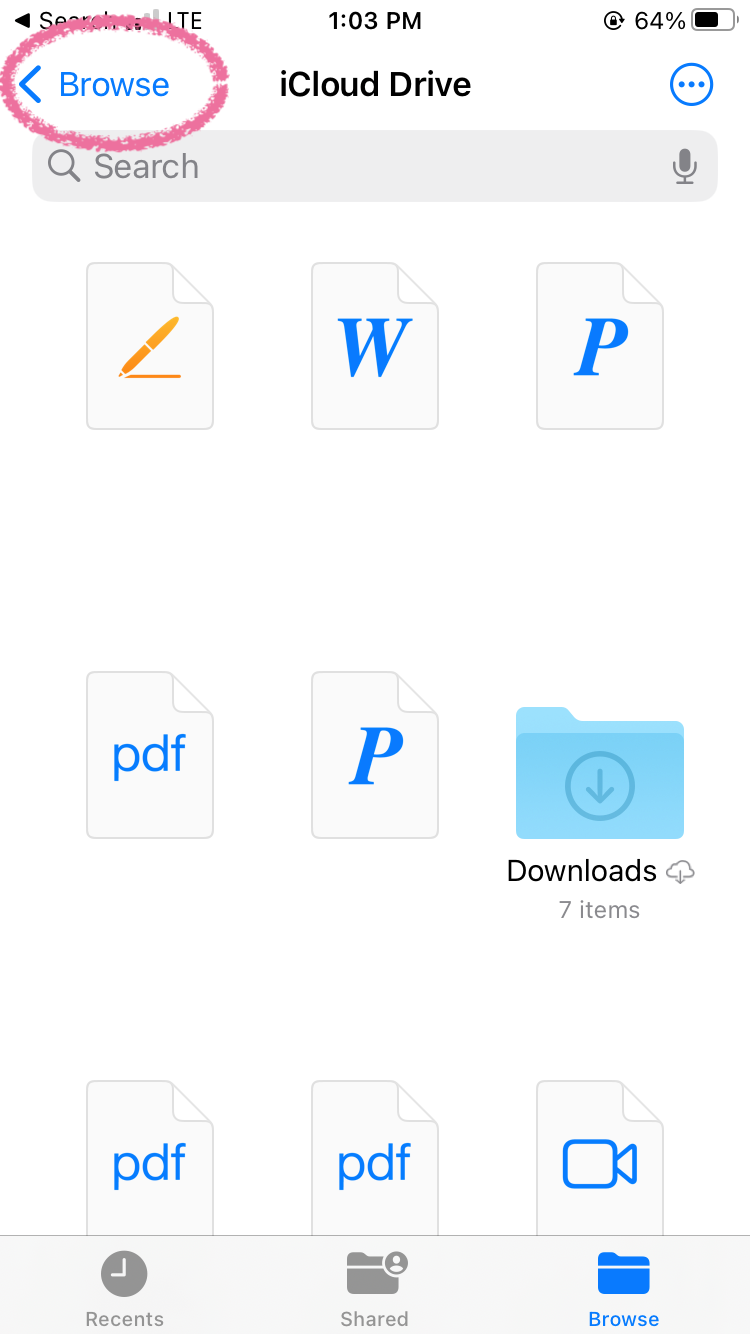
Once you’re in the app, tap “Browse” in the bottom-right corner. You’ll probably automatically be brought to the iCloud Drive folder, but you’ll want to tap “Browse” again in the top-left corner and select “On My iPhone.”


Press the three dots in the top-right corner, then tap “New Folder.” Open the New Folder it creates.


Tap and hold any empty space in the new folder. When the menu pops up, select “Paste.” The image will appear here!


Tap on the image, then tap on the arrow next to the title. Press “Save to Photos.”

The new photo should now be in your Camera Roll ready to upload! Hint: If you don’t see it in “All Photos,” check “Recents!”
Set Your Phone to Always Save as JPEG
The process we discussed above works for photos already saved as HEIC. But, if you don’t want to repeat it every time you need to upload a photo, you can also change your phone’s settings so your pictures always save as JPEGs!
Open the iPhone Settings app and scroll down to “Camera.”

Too much scrolling? Type “Camera” into the search bar!

Tap “Formats,” then choose “Most Compatible.”


And you’re all set! Now your photos will automatically save as JPEGs.
Choose the Best Aspect Ratio for Your Post
You’ve probably seen the words “Aspect Ratio” hundreds of times before. But what exactly is an aspect ratio, and which should you choose?!
Aspect ratio is the ratio between the width and height of an image. Some sites, like Instagram, require a specific aspect ratio to upload a photo or video. So, it’s essential to get it right.
My rule of thumb with aspect ratios:
● Use 4:5 for portrait photos and videos.
● Use 1:1 for square photos and videos.
● Use 16:9 for landscape photos and videos.
Here’s one cool tip — you can actually adjust your aspect ratio to 16:9 or 1:1 before you take a photo on an iPhone! 4:5 requires a little extra work — we’ll get into that in a second.
Open your camera and press the tiny upward-facing arrow in the center of the top menu. Then, tap the circle that says “4:3.”


Choose “Square” for a 1:1 ratio, or 16:9 for a landscape ratio.


If you want to use a 4:5 aspect ratio, you’ll have to adjust it after you take the picture.
Snap a photo with the usual 4:3 ratio, then open it in your Photos app. Tap Edit in the upper-right corner, press the crop icon at the bottom-right, then tap the icon to the left of the marker.

Make sure you have the portrait icon selected, then tap 4:5.

Press Done to save your changes, and you’re all set!
Send Photos to Another Device While Preserving Quality
We’ve all been there — you have a perfectly-shot, edited photo on your phone. Then, you send it to your computer (or vice versa!) and it’s grainy, the colors aren’t as bright, and overall, it just doesn’t look good.
If you have a MacBook, the best way to preserve image quality is to transfer photos between devices through AirDrop. If not, you can add them as email attachments.
Send Photos with AirDrop
Using AirDrop is easy, whether you’re sending a photo from your phone to your computer or from your computer to your phone.
First, open the photo you want to send. On iPhone, tap the Share icon in the bottom-left corner, then select “AirDrop.”


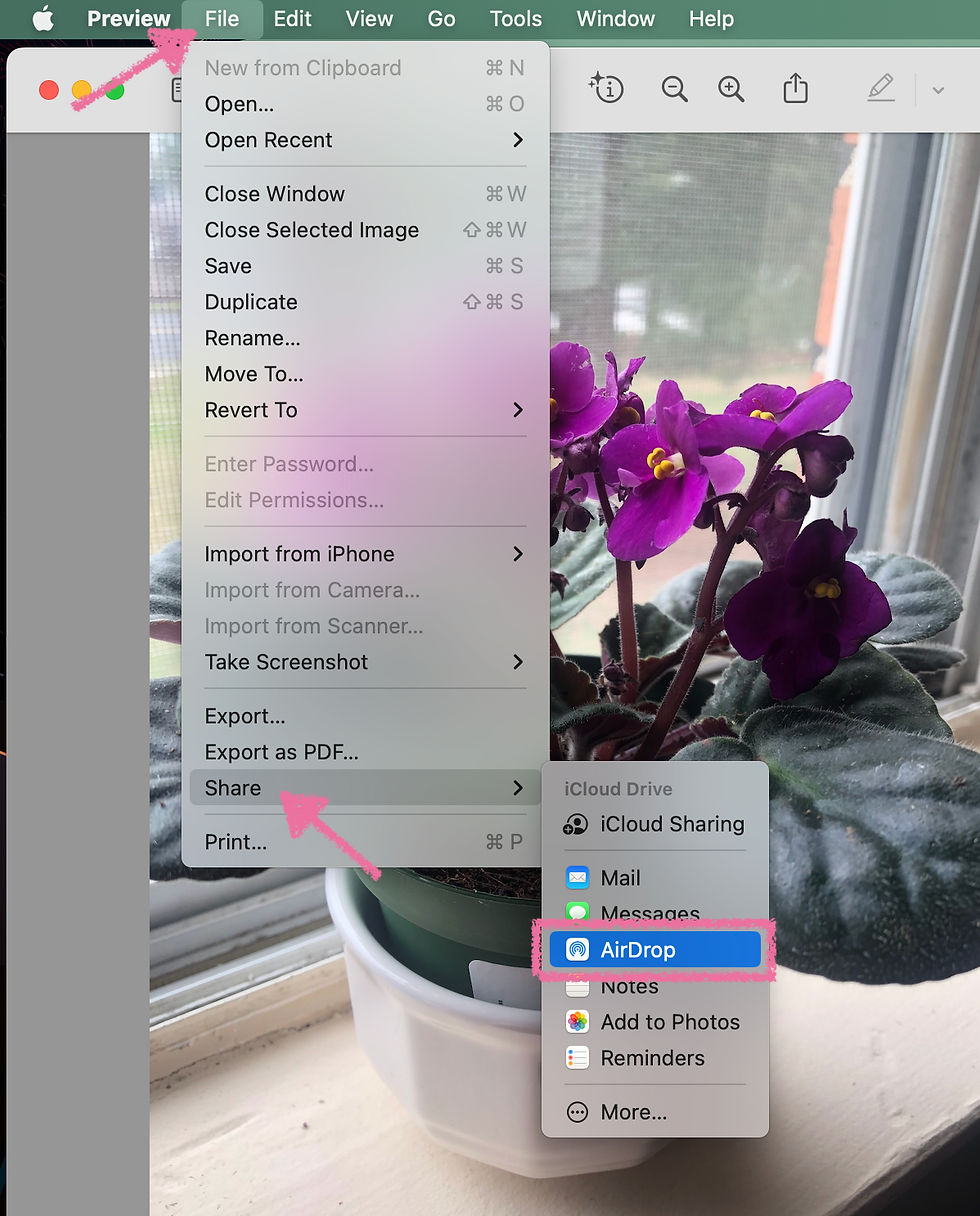
If you’re on a MacBook, open the photo in Preview. Then, click File > Share > AirDrop.

Make sure whatever device you’re sending the photo to is unlocked, then select the device in the AirDrop menu.


If you send it to a Mac, the image will go to your Downloads folder. If you send it to an iPhone, it’ll save to your Camera Roll.
Send Photos via Email
Can’t use AirDrop? That’s okay — Email works too! But you need to make sure you’re doing it the right way to preserve the quality.
When you email yourself a photo on desktop, it usually just sends the original photo with no tweaks. But mobile is a different story.
To email yourself a photo from an iPhone, open it in your Camera Roll and tap the Share icon. Then, tap the Mail icon.

In the Email composition screen, type your Email address into the “To” field. It doesn’t matter that it’s from the same email address! You can enter a subject line, but unless you’re sending multiple emails to yourself, it doesn’t really matter.
When you’re ready, press the Send icon. And here’s the important thing — you’ll be asked if you want to reduce the image size. Always press “Actual Size.”


It’ll take longer to send, but the quality will be much better.
Turn on Captions for a Better User Experience
Most people don’t casually scroll through Facebook or Instagram with their sound on. So, if you post a video of you talking without any captions, you’re losing out on some valuable views and reactions!
Luckily, Meta Business Suite recently added an auto-caption feature. Upload your video, then press Next.

On the “Optimize” screen, you’ll see an option to add captions to your video. Make sure to leave this checked.

Now, Facebook will automatically generate captions for your video — no extra work on your end is required!
Duplicate Glitchy Meta Posts
It’s no secret that Meta Business Suite is glitchy more often than not. Sometimes, this means your scheduled posts don’t publish when they should!
Instead of re-uploading the photo or video and rewriting your entire caption, open Meta Business Suite and select “Content” in the side menu. Note: Some people might see “Posts & Stories” instead of “Content.

Click the “Scheduled” tab, then find the post that failed to publish. You can try to tap “Edit Post” and publish it immediately — but in my experience, that doesn’t usually work.
Instead, tap the three dots next to “Edit Post.”

Now, press “Duplicate Post.”

This will copy everything from the post that wasn’t published. Photos and videos, captions, even placements! Hit “Publish” and you’re good to go.

Happy Posting!
You may run into issues from time to time, but knowing how to deal with common posting-related problems makes it much easier to run a small business online.
Technology isn’t perfect — but whatever problem you’re having, it can usually be solved with a little creative thinking and troubleshooting!


Comments