How to Get Started with Canva!
- mattiesprague
- Jun 23, 2021
- 6 min read
Canva is a free online resource that you should definitely be taking advantage of. Creating graphics doesn't have to be rocket science - Canva makes it easy! If you’re ready to take your Instagram or Facebook business page to the next level, sign up for Canva today and begin creating.
Getting Started
The first thing you’ll need to do is sign-up for Canva. This will allow you to save your work and come back to edit if needed. Once you complete the sign-up process, return to the Canva homepage to begin creating your first graphic!
At the top of the page, you’ll see a toolbar. Choose “Templates,” and then choose the type of graphic you’d like to create. In this post, I’ll be creating an Instagram Story graphic!


Once you choose the type of template you’d like to use, you’ll be brought to a page with hundreds of free templates! You’ll notice a small crown icon next to some templates, which means they are “Pro” options that cost money to use. To view only free templates, look at the filter options directly below the header. It’s automatically set to view both “Free & Pro” templates, but you can choose to view only free options by selecting it from the drop-down menu.


You’ll also notice an option on this page to create a graphic from a blank template. Once you get more comfortable using Canva, you might want to try this out to create one-of-a-kind graphics! For now, however, we’ll be working with a template.

Tips for Choosing and Editing a Template
When scrolling through all of the options, you’ll notice that there are quite a few! Don’t get too bogged down on the exact graphic shown on the sample, because the colors and fonts can be changed and elements can be added or removed. Choose something that fits the general vibe of your brand, and remember to keep these do’s and don'ts in mind:
● DO make it simple. You don’t want to have too much going on in the graphic, because this can distract from the overall message. Use easy-to-read fonts, colors that complement each other well, and images that don’t distract from the text.
● DO make it memorable. The best-looking graphics will attract the right kind of attention, and people will actually stop to read what you have to say rather than scrolling right past! Memorable graphics will also keep your message in the reader’s mind, so you’re more likely to get both clicks and sales.
● DO make it creative. While your graphic should be simple, it should also be creative enough to turn heads and encourage people to read. Make sure it stands out from the crowd!
● DON’T throw text all over your graphic. This is especially true when you’re making a graphic to post on your Instagram or Facebook Story! People don’t want to spend a lot of time trying to read or understand what you’re trying to say. Get straight to the point, and make sure any text you add is big and clear enough to read quickly.
● DON’T just take the template and change the text and images. Although this might seem like the easiest way, it’s not very creative or memorable. Delete any elements that aren’t necessary, and change up the colors to fit your brand!
Now that we’ve covered some do’s and don’ts, it’s time to start creating your graphic!
Working with Canva’s Editor Tool
Following the above tips, choose the template that you feel would best get your message across. Click on the template to view it more closely, and if you feel satisfied, click “Use This Template.”

This will open Canva’s editor. From here, you can edit your graphic as you please! Once you finish, you can download it for free to post wherever you’d like.

As you move over the image, you’ll notice differently-sized blue boxes popping up.

These allow you to choose different elements on the graphic. When selected, you can move them, change their color, or delete them altogether! For example, I’d like to change this darker pink color to a lighter one. I’ll click on the element, then use the color icon on the left of the toolbar to open the color tab and change it.

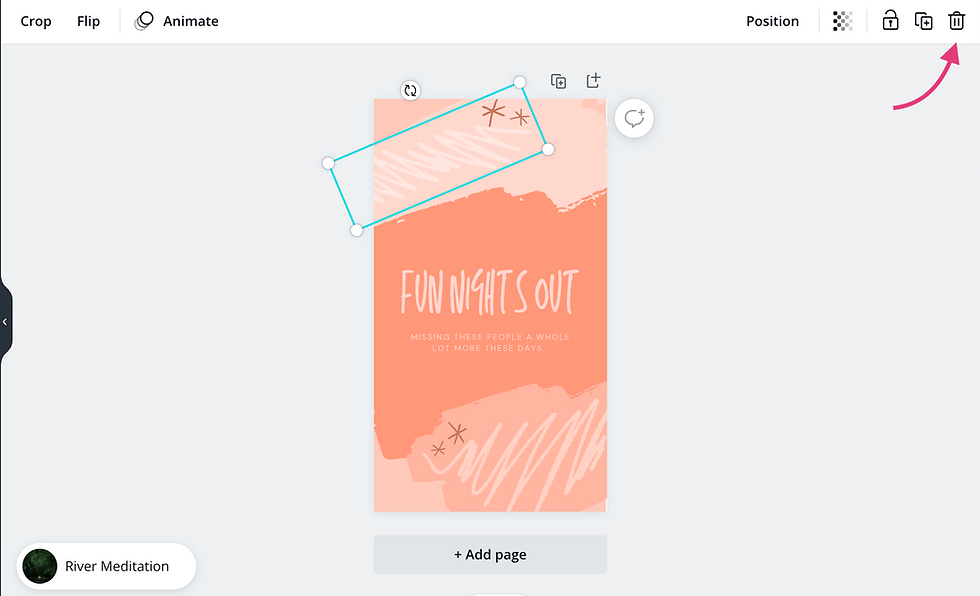
Now, I’ll remove these squiggly lines at the top of the image. I’ll select them, and then use the trash can icon in the top right corner to delete them!

I need the text on the graphic to reflect its purpose, so I’ll click on the text box and type in my message. Once I do this, however, I realize the text isn’t exactly easy to read! So, I’ll choose the font box and change it to a different font.

Once I changed the font, I also typed new text below it, changed the color and text size so it’s easier to read, and moved it up to better fit the size.

I also decided to remove the squiggles and stars on the bottom, as they were slightly distracting from the text. When all was said and done, here’s what I ended up with!

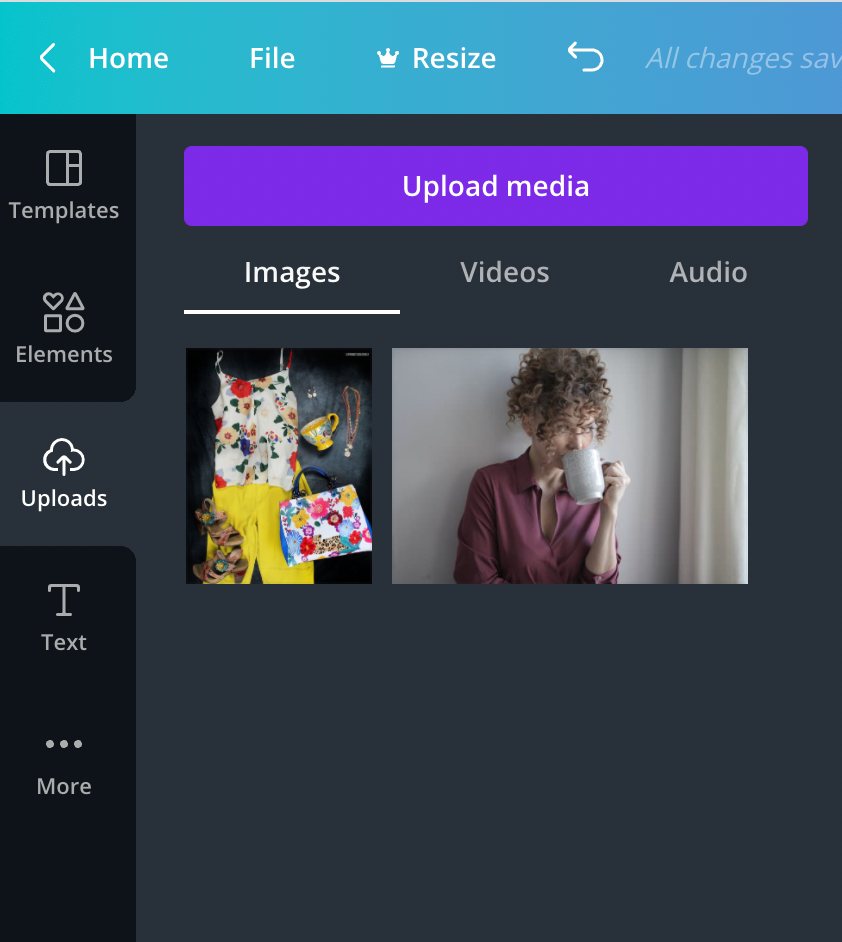
BONUS: I didn’t add any images to this graphic, but here’s how it’s done: on the sidebar, choose “Uploads.”

Then, choose “Upload Media” and upload the image you want to use. Once the image uploads, all you have to do is click on it and it’ll jump onto your image! From there, you can rotate and resize it to place it as you’d like.


Finishing Up
Now that your graphic looks the way you want it to, it’s time to make it behave the way you want it to! Here’s how to change or remove music and animations on your graphic.
If the template you chose has music, you’ll see something that looks like this in the bottom left corner of the editing screen.

I don’t want my graphic to have music in the background, so I’m going to remove it! Click on that same music icon, and a toolbar will pop up on top. From there, you can press the trash can icon to remove the music.

If you’d like to change the music instead of removing it, you can do so by first choosing “Elements” on the side menu, then scrolling down to “Audio.” Press “See All” to evaluate your options and choose the one that fits the graphic best!

If you’d like to choose a different snippet of the song than what’s automatically selected, you can do so by using the same toolbar you’d use to remove it. Just click along the timeline until you find a snippet that you like.

Some templates will also feature animations. To change the animation, choose the animation icon in the top left corner of the toolbar.

This will open up a box with different animation choices. You’ll notice that some have the same crown icon as some of the templates, which means they are Pro options that you’ll have to pay for to use. To avoid a fee, choose the free animation you like the best!

You can also change the length of time your graphic animates with the clock icon right next to the animation icon. The default is 10 seconds.

Saving & Downloading Your Graphic
We’re almost done! These are the final steps you need to take before your graphic is ready to use. The next thing you’ll have to do is give your graphic a title so you can better recognize the file once it’s downloaded.
Select the text box at the top of the screen, and type in a title for your graphic.

Once the graphic has a title, it’s time to download it! You can press the download icon at the top right of the screen, or click the three dots next to it to publish it automatically.

Pressing download will open this menu:

While pressing the three dots will open this menu:

Download or publish your graphic, and you’re all done! You can now upload it wherever you need to. If you’d like to go back and edit your graphic after this first time, you can do so on Canva’s homepage. Look at the sidebar menu, and choose “All Your Designs.”

Then, just click on the graphic to open the editor again!
Final Thoughts
After I downloaded my graphic, this is what I had:
It’s very simple, yet provides enough information for clients to inquire further! It’s not overloaded with different elements, and I made sure to not add any images that would distract from the overall message.
Canva is an excellent tool for creating your own graphics, and it’s 100% free to get started. Start using Canva today, and you’ll be an expert graphic designer in no time!


Comments